REST API Documentation
Introduction
CookBook Topics
Introduction
Overview
The following are REST API cookbook recipes for users and partners creating integrations using The Jama Connect REST API. They’re intended to answer frequently asked questions from users attempting to create Jama integrations and to encourage best practices in Jama API usage.
THIS IS A LIVING DOCUMENT:
If you or your team have suggestions that should be included in this documentation, Jama is all ears. Talk to us and let us know what pain points you are experiencing so we can work best practices into the flow.
Important Links
Cookbook Topics
Sample Header
Note that Jama only supports JSON but the Content-Type value is required
PUT /jama/rest/v1/items/23 HTTP/1.1
Host: localhost:8080
Authorization: Basic c2FtcGxlOnBhc3N3b3Jk
Content-Type: application/json
Cache-Control: no-cache
Sample Response
Jama is extremely configurable by business users. At any time, an Organization Admin may choose to create, modify or remove an item type, which if you are not familiar, you can think of as an artifact. This means that Jama needs to provide developers with the ability to discover the available item types and the types of fields used, including picklist values. Any integration that hard codes these should expect surprises when the business decides to change several labels, add a new field, or remove a pick list value.
Meta
The meta section provides an overview of the response and, when returning a list, the size of the list and the location within the pagination.
{
"meta": {
"status": "OK",
"timestamp": "2015-09-10T23:05:53.856+0000",
"pageInfo": {
"startIndex": 0,
"resultCount": 20,
"totalResults": 37
}
},
Links
The links section was designed to serve two purposes. First was to make the Jama content and configuration discoverable. Links are provided to easily retrieve valid picklist values, item type descriptions, related items, users, or projects. The second purpose of the design is to manage the size of the response and remove duplicate information. Some item types can have upwards of 50 fields and returning all content around a status pick list in each item would not be efficient.
"links": {
"data.location.parent.item": {
"type": "items",
"href": "http://localhost:8080/jama/rest/v1/items/{data.location.parent.item}"
},
"data.modifiedBy": {
"type": "users",
"href": "http://localhost:8080/jama/rest/v1/users/{data.modifiedBy}"
},
"data.project": {
"type": "projects",
"href": "http://localhost:8080/jama/rest/v1/projects/{data.project}"
},
"data.createdBy": {
"type": "users",
"href": "http://localhost:8080/jama/rest/v1/users/{data.createdBy}"
},
"data.fields.priority": {
"type": "picklistoptions",
"href": "http://localhost:8080/jama/rest/v1/picklistoptions/{data.fields.priority}"
},
"data.fields.release": {
"type": "release",
"href": "http://localhost:8080/jama/rest/v1/release/{data.fields.release}"
},
"data.fields.status": {
"type": "picklistoptions",
"href": "http://localhost:8080/jama/rest/v1/picklistoptions/{data.fields.status}"
},
"data.itemType": {
"type": "itemtypes",
"href": "http://localhost:8080/jama/rest/v1/itemtypes/{data.itemType}"
}
},
Data
The data section is broken up into two areas. The top area consists of the data that the system includes on every item within Jama. The “fields” section matches the fields configured on an item type and will match the content visible in the UI. Fields may be in both areas as an admin can opt to show system fields, such as createdBy, in an item’s detail view.
Note the “status”: value of 293 and be plugged into the above link to retrieve the details. http://localhost:8080/jama/rest/v1/picklistoptions/293
"data": {
"id": 25,
"documentKey": "CP-REQ-5",
"globalId": "GID-25",
"itemType": 24,
"project": 1,
"createdDate": "2014-09-09T03:32:21.000+0000",
"modifiedDate": "2014-10-16T03:44:30.000+0000",
"lastActivityDate": "2014-10-16T03:44:30.000+0000",
"createdBy": 5,
"modifiedBy": 5,
"fields": {
"documentKey": "CP-REQ-5",
"globalId": "GID-25",
"name": "Uploading of Patient Records",
"description": "
Resources
The resources section provides a list of the available actions for the authenticated user. In the example below, the user who made this request can opt to read, update, or delete the item.
"resources": {
"self": {
"allowed": [
"GET",
"PUT",
"DELETE"
]
}
},
Location
The location section is designed to present the data about an item’s location with a project’s explorer tree. These values are derived by the system and the parent can be controlled via the REST API. This means that the specific order within a tree node cannot be set. Updating an item’s parent will place it at the bottom of that parent’s list of children items.
"location": {
"sortOrder": 1,
"globalSortOrder": 4063,
"sequence": "2.1.7.1.2",
"parent": {
"item": 23
}
},
Lock
The lock section handles the different locks that can be applied within Jama. A user may lock an item by editing an item, opting to lock an item for themselves, or changing a workflow state that results in a locked item.
"lock": {
"locked": false,
"lastLockedDate": "2012-11-16T04:44:30.000+0000"
},
"type": "items"
}The Date format used is based on the ISO 8601 standard but has additional restrictions. The time field and the timezone must be included. For example, July 1st, 2015, 11 AM in GMT would be written as 2015-07-01T11:00:00.000+0000. Note that the UTC offset is required because Jama uses UTC time to avoid ambiguity. In this case, the offset is +0000 for GMT. Jama will always respond with the +0000 offset.
Examples
| Date or Time | Accepted in Query Parameters | Format from REST Response |
|---|---|---|
June 18th 2015 |
2015-06-18T00:00:00.000+0000 |
2015-06-18T00:00:00.000+0000 |
July 4th 2011 @ 1:59pm PST |
2011-07-4T13:59:00.000-0700 |
2011-07-4T20:59:00.000+0000 |
Note that date fields on items do not have time granularity. You will use yyyy-MM-dd format for these. E.g. 2015-09-05 for September 5th, 2015.
This parameter provides the ability to pull the content from linked objects to reduce the number of requests needed to retrieve information. For a great overview of how our design came about and the thoughts that went into it please read. http://www.jamasoftware.com/blog/rest-api-design/.
Example Request:
curl -X GET --header "Accept: application/json"
"https://www.jamaland.com/rest/v1/items/2737149?include=data.fields.priority&include=data.project"
The response includes a new linked section:
"linked": {
"projects": {
"24114": {
"id": 24114,
"projectKey": "API",
"isFolder": false,
"createdDate": "2014-06-05T11:12:01.000+0000",
"modifiedDate": "2016-01-19T19:28:57.000+0000",
"createdBy": 22374,
"modifiedBy": 21798,
"fields": {
"projectManager": 21798,
"user1": 22374,
"projectKey": "API",
"statusId": 178902,
"text1": "",
"name": "REST API",
"description": "",
"projectGroup": 178905
},
"type": "projects"
}
},
"picklistoptions": {
"178888": {
"id": 178888,
"name": "High",
"description": "",
"value": "5",
"active": true,
"color": "9CE78C",
"sortOrder": 4,
"pickList": 102546,
"default": false,
"type": "picklistoptions"
}
}
},The PATCH http verb is available for various (but not all) resources.
PATCH allows for partial updates of REST resources. You do not have to have the entire object (e.g. Request Item required for PUT) to make an update. A list of Request Operations is used to transform the current version of the object.
JSON Payload: Request Patch Operation
For PATCH /items/id, you will provide a list of changes you want to make. This is based on RFC 6902. Currently, we support add, replace, and remove.
This operation sets the value to the field in the path. The field at the path must exist. Value is required.
{
"op": "replace",
"path": "/fields/name",
"value": "New Updated Name"
}
This operation clears the value of the field in the path. The field at the path must exist. Value does not need to be set.
{
"op": "remove",
"path": "/fields/description"
}
This operation sets the value to the field in the path. If the field does not exist at the path, it is added. Value is required.
{
"op": "add",
"path": "/fields/customField$12",
"value" : "Hello!"
}
Notes
- Paths always reference what you would expect to see in a request object JSON payload for the PUT endpoint of the resource you are working with. This means you must provide the $ suffix on custom field names (see the “add” operation above).
- Expect new 400 errors.
- “no such path in target JSON document” – Check that the path is possible on the Request Object for the resource. A field will not show up in the request object if it is currently null.
- “The value you provided could not be set at the path.” – Check that the value matches the type at the path. i.e. Are you trying to set an integer to a string field?
- Remove will ensure that the attribute in the path is cleared. A valid path must be provided.
- You may provide JSON objects with nested values as the ‘value’ of a Request Patch Operation. For example, you may replace an items location with a whole Request Location.
"value": { "parent": { "item": 99 } }The API provides strict pagination to reduce load on the application.
- startIndex – Integer that describes the current response’s offset into the list of all results.
- resultCount – Integer that describes the max number of items returned per page. The default response is 20 items, however, an upper limit of 50 can be provided.
- totalResults – Integer that describes the total amount of items available in the list.
Jama reserves the right to throttle API usage to ensure a satisfying experience for all our customers. Because REST clients may make unlimited requests, we must protect our systems from slow performance due to these types of calls. We will describe our throttling techniques below.
When will my REST API requests be throttled?
When you exceed 10 requests per second and you exceed the 100-request queue limit. Afterward, you will receive 429 response codes until the queue is under the threshold.
These throttling rates should be considered temporary as we plan to make changes as our architecture evolves. You may not experience these throttling rates but be prepared to handle them. Stay tuned for more updates.
Configuring self-hosted throttling limits for the API
Jama provides an option to help self-hosted system admins protect their Jama Connect servers. The system can stop aggressive integrations from overwhelming the CPU and degrading overall system performance by throttling the threads available and queuing API requests.
This option is configurable to fit the CPU cores available and requires a restart to enable. The setting for threads will not reserve CPU cores for API requests, just that the requests will not be able to exceed the configured value, sparing CPU for other activities.
API calls are not throttled by default and configuring this feature will likely require existing integrations to be updated.
Configuration
The parameters can be configured by updating the default values available within the Replicated administration console used to manage Jama Connect installs and upgrades.
Within the Advanced Startup Settings section, enter in the below values into the box titled Add services configuration (key=value pairs on separate lines)
Example:
api.throttler.concurrentLimit=2
api.throttler.waitLimit=50
api.throttler.timeout=30000
Note: If an invalid value is specified for any of these settings (ex: -1), throttling will instead revert to the default value. This will be indicated in the contour.log
api.throttler.concurrentLimit
Sets amount of API requests the server will process at once. A value of 0 will stop the application from accepting requests.
Recommended Value: No more than half of the available cores.
Failure Message: No requests allowed
REST Failure Status: 429
api.throttler.waitLimit
Sets amount of API requests that can be queued up when the concurrentLimit is reached. Once full, new requests will be rejected until space is available in the queue.
Recommended Value: 50
Failure Message: Too many requests were waiting REST
Failure Status: 429
api.throttler.timeout
The length of time (in milliseconds) that a request can be in the queue before it is considered stale. 30000 = 30 seconds
Recommended Value: 30000
Failure Message: Request timed out while waiting for REST
Failure Status: 429
Logging
Throttling messages will be logged to the contour.log file. Circumstances that lead to a request being rejected due to throttling (such as too many requests in the queue) will result in an error message similar to the following:
2016-01-18 18:35:58,587 WARN http-apr-8080-exec-4 jamatenant_qa5256 [org.apache.cxf.phase.PhaseInterceptorChain] – The application has thrown an exception, unwinding now org.apache.cxf.interceptor.Fault: Too many requests were waiting
You can optionally enable DEBUG logging on the following package:
- com.jamasoftware.contour.rest
The debug logging will let you know what the concurrent count and wait, count are as each request goes in and out of the system.
This guide is not intended to provide exact implementation but offer guidance and some best practices for the Jama side of your integration.
Searching for Relevant Data and Detecting the Latest Changes
When integrating with Jama it is important to try to be able to filter on precisely what you are trying to sync without pulling in more data than you need.
Using Abstract Items for Search
Abstract items are the best way to create filters on the fly in our API. You will not be able to create as advanced queries as the filter option, but you do not depend on any filter being set up beforehand. Check out the Cookbook section Searching with the Abstract items endpoint for details on how you can select the items you want to be synced from Jama.
Once you have defined the query you want to use, you should be able to page through all the results in an initial import. After that, you may use the ‘lastActivityDate’ query parameter with /abstractitems to find what has changed since your last sync window. You can learn more about what activities update the last activity date in the cookbook section What triggers the Last Activity Date?.
Pros:
· On the fly filter that can be dynamically changed
· Set up requires no interaction in the UI
Cons:
· Paging may not be reliable with real-time data due to the sorting and potential changes in the data between requests.
Using Filters for Search
In Jama’s UI you can create advanced filters to query with. This may be a better solution than abstract items if you require more specific items than what abstract items offer. Once you have saved your filter, you may view the results of the filter in the API. Just like with abstract items, you can page through all the results first for your initial sync, and then you can use the lastActivityDate query parameter on the results the same way you would in abstract items. This will allow you to see only what has changed recently so you know what needs to be updated.
Pros:
· Advanced filtering allows for nested AND / OR groupings. You may filter on an item’s specific location within a project.
Cons:
· You must create the filter in the UI and you must update it from the UI.
· Paging may not be reliable with real-time data due to the sorting and potential changes in the data between requests.
Using Activities to Detect Changes
An alternative to using the last activity date and filters, you can use the activities endpoint to page through a log of changes made. You will not be able to have the same level of filtering, but you will be able to see events in the order that they happen without missing anything. You will have to use abstract items for your initial sync, but after that, you should be able to follow the logs in activities to track changes.
Pros:
· Append only log that is much easier to keep track of changes. No tricky pagination problems with the real-time data
· You can get more detailed information about what has changed.
Cons:
· Only basic filtering, project, and item type
· Endpoint lacks documentation and has a confusing model.
· Must unwrap batch events
Detecting Comments Added to Relevant Items
The last activity date does update when a comment is added directly to an item. For now, you must check for any new comments of the /items/id/comments endpoint.
What is this Realtime Paging Issue?
If you are sorting items by their last activity date, you may see items change order when they are updated between your requests. We do not have a good solution for this yet except for using the activities endpoint.
What is the Lagging Index Issue?
The last activity date of an item gets refreshed when it is saved in the database. However, there is a brief, albeit existent, delay between this update and the moment you can access the item via the REST API. Consequently, there’s a chance that when you sort items by their last activity date, a particular item might not immediately appear in the results. To mitigate this, it’s advisable to provide a small time buffer, perhaps around 5 seconds, to ensure that your synchronization intervals have some overlap.
Detecting Changes by Your Integration
You should always consider the modifiedBy attribute on items when reading for changes. If the modifiedBy is from your syncing integration user, that is a strong signal that you do not need to read the item for more changes.
Reading Data From the API
When you have detected that an Item has changed, you will naturally want to download the data and sync it to the other system. Ideally, you should be able to retrieve the necessary information when querying for updates. If you are using /filters or /abstract items, you should utilize the includes parameter to download as much as you can without having to make extra calls. You should determine what fields you are interested in so that you can include them in every request. Read more about the included feature on the Jama developer portal. Basically, it allows you to retrieve all referenced objects on an item, so you do not have to pull for more information in another call.
Downloading Attachments from Rich Text Fields
Jama’s rich text editor lets users add images and other attachments to the rich text content. This process is streamlined and does not necessarily work the same way as the attachments widget. When you read the content of a rich text field, you may come across an image or link that looks like this:
https://{jama-base-url}/attachment/65/someImage.png
Where: 65 = the id of the image (not the attachment container)
REST authentication methods don’t work for these paths and you must use a workaround in order to download the image. You can download the image with our /files endpoint like so:
GET https://{jama-base-url}/rest/v1/files?url=https://{jama-base-url}/attachment/65/someImage.png
* With URL encoding
Where: 65 = the id of the image (not the attachment container)
Writing to Jama with the API
Items can be updated through the API. If the item is locked by someone else, you will have to unlock it or wait for the other user to unlock it. You may also lock an item to prevent others from updating the item while you sync. However, you probably want to make changes as quickly as possible without locking the item for a very long time. We provide two methods for updating an Item, PATCH and PUT.
With PUT, you must provide the entire contents of the item. If a writable field is omitted, the API will assume you want to remove the data from that field. Another problem is that you need to take extra care to make sure you have the latest version of the item so that you do not overwrite it with old data that you did not intend to change. To verify that you are updating the item exactly how you expect, it is recommended you follow these steps:
Lock the item
PUT {jama-base-url}/rest/v1/items/{itemId}
{ "locked" : true }
Now get the most recent version of the item.
GET {jama-base-url/rest/v1/items/{itemId}
Copy the “data” object from that response and apply the changes you would like to make using that.
Now use PUT to update the item’s content. Note, you cannot update read-only fields. However, if your value matches the existing value of the item, the API will still accept your request. If you supply a read-only field value that is different than the existing value, you will get a 400 error.
PUT {jama-base-url}/rest/v1/items{itemId}
{ item payload }
Now unlock the item.
PUT {jama-base-url}/rest/v1/items/{itemId}
{ "locked" : false }
You may choose to not lock the item before using PUT. This is very reasonable because the locking increases the number of requests used to update an Item. However, locking the item does ensure you do not unintentionally overwrite data that has been changed since you retrieved the content of the item.
A better method for updating items is to use PATCH because you do not need to lock the item and get the latest state of the item to make an update without fear of overwriting recent changes. Instead, you will be able to specify exactly which fields you would like to update without affecting anything else in the item. For example, you can update the name and description of an item like this.
PATCH {jama-base-url}/rest/v1/items/{itemId}
[
{
"op": "replace",
"path": "/fields/name",
"value": "Updated Name"
},
{
"op": "replace",
"path": "/fields/description",
"value": "Updated Description"
}
]
Please read more about PATCH here on the Dev channel.
Updatable fields only by API
In your item type configuration, you may specify a field to be read-only. When you do this an option will appear to make it editable for the API. This enables you to establish dedicated fields for your integration, guaranteeing that users in the UI won’t unintentionally modify the value. However, via the API, you will have the capability to update the value as needed. If you would like to configure a field like this, edit your item type in the UI Admin screen, and configure the field to be “Read Only” and “Allow API Overwrite”.
Updating Test plans, Test Cycles, and Test runs
Test center’s API is a little different from your project tree-type items. Test Center is built on a workflow that the API is required to follow at the moment. If you need to sync test center items, please refer to the cookbook section: ‘Executing Tests through the Jama REST API‘
How to update an item
You may use PUT or PATCH. PATCH allows you to update an item without providing the whole context, it is more ‘atomic’. See Developer Portal
Adding/removing Relationships
Adding and removing relationships should be straightforward with our API. Some projects may be configured with relationship rules that you must follow.
To create a relationship, you may make a call like this:
POST {jama-base-url}/rest/v1/relationships
{
"fromItem": 1,
"toItem": 2,
"relationshipType": 12
}
To remove a relationship, you must know the relationship ID. If you know one of the related items, you may find the relationship id with the following methods:
GET {jama-base-url}/rest/v1/abstractitems/{id}/upstreamrelationships
GET {jama-base-url}/rest/v1/abstractitems/{id}/downstreamrelationships
And then to delete the relationship, you may use DELETE:
DELETE {jama-base-url}/rest/v1/relationships/{relationshipId}
You may also call PUT on the relationship if you intend to update the relationship’s toItem, fromItem, or relationshipType.
Creating Attachments
Please follow the documentation provided in the cookbook section. REST Attachments
Creating Comments
If you need to create a comment, use the POST /rest/v1/comments endpoint. You will be able to specify a project or item for the comment location. You may also create a reply to a comment with the in reply to field. Just use the ID of the comment you would like to reply to.
Moving an Item
You can move items around in a project with the REST API. You must use the PUT /rest/v1/items/{id}/location endpoint. This endpoint allows you to set the parent of the item, whether it is the project root or some other item. You will not be able to specify the order the item is placed near its siblings, it will always be placed in the last position. There is no location for test plans, test cycles, or test runs so you cannot update their location.
Links and Tags
Links and Tags may be configured to be added to an item type. There are specific endpoints for each of these item facets. You can GET, PUT, POST, and DELETE tags and links with the /tags and /links endpoints off the item (e.g. /rest/v1/items/{id}/tags or /rest/v1/testplans/{id}/links).
In Jama Connect, there is a flow for executing test cases through the API. This guide will give you an overview of the testing-related objects in Jama Connect and show you the API calls needed to take a test all the way through execution. Some examples will be given from some of our own implementations at Jama.
Getting Familiar with Jama Connect Test Center Objects and Concepts
There are some core objects and concepts to have in mind when working with the Test Center.
Test Case Item
A Test Case Item is like a regular item in Jama, with extra fields (such as steps) and capabilities (it can be executed). Test Cases are created inside Projects just like items, independent of Test Plans. They are also versioned like other items.
Test Run Items
A Test Run Item can be thought of as an execution instance of a Test Case Item. They are created by the system when a Test Cycle is created inside a Test Plan, and they are updated with a status and actual results when executed. A Test Case could have many Test Runs associated with it. These cannot be created directly; this is the reason there is no POST in the /testruns REST endpoint.
Test Plans
A Test Plan is a collection of Test Cases grouped into Groups for organization and Cycles for execution. Test Plans can be created directly.
Test Groups
Test Groups are a grouping of Test Cases inside a Test Plan. They have no direct impact on the way Test Cases are executed; they exist mostly to allow users to group Test Cases into some sort of meaningful sections. For instance, a Test Plan could have groups based on functional breakdowns like “Tree Operations”, “Items”, etc. Although they are not pertinent to execution, each Test Plan must have at least one Test Group in which to place tests. Test Plans are created with a group called “Default Test Group” which can be used or replaced with custom groups.
Test Cycles
Test Cycles are a collection of Test Run Items that correspond to a particular execution of a Test Plan. For example, you could have a Test Cycle for each release candidate build, or Test Cycles for different browsers, depending on what makes sense for your testing. This terminology may be a bit confusing at first when coming from other test management systems, but the thing to keep in mind is that a “Test Run” is a single item, and a “Test Cycle” is a collection of Test Runs that have been run together at the same time for the same organizational purpose.
When a Test Cycle is created, all Test Case Items in that Test Plan have corresponding Test Run Items created in the system for that Test Cycle. Accordingly, a Test Cycle must be created before any Test Case can be executed. Test Cycles cannot be created independently of a Test Plan (there is no POST in the /testcycles endpoint).
An Example: These concepts as written definitions are a bit tricky, so here is a bit of a rundown on how we test internally:
We have a master regression library with hundreds of Test Case Items that we can test. At the time of each release regression, we create a few different Test Plans based on different configurations of the product, in our case, “Release 8.20 – Hosted”, “Release 8.20 – Clients”, “Release 8.20 – Server & Database”. Inside those Test Plans, we add all, or a subset, of the Test Cases in the regression library, grouped by hierarchy, which, in our case, corresponds to areas of the product like “Stream” and “Projects”. To execute these tests, we create one or more Test Cycles in the Test Plan. The “Release 8.20 – Clients” plan, for instance, tests different browsers, so there are cycles like “MacOS Chrome”, “Windows Firefox”, “Internet Explorer”, etc.
Much of our regression library is automated, and our automation tooling executes, and updates results via the API using methods similar (but with much more wrapping) to what will be outlined below.
The Process
This process assumes you already have created Test Case Items that you want to execute. If you are only updating existing executions, you may need to skip further down in the guide.
Creating a Test Plan
First, a Test Plan must be created. If you are planning to use an existing Test Plan that has already been created (using the API or UI), you can skip this section.
POST /testplans with a payload like:
{
"project": 43,
"fields": {
"name": "Connect Plan 1"
}
}
project
is the API ID of the project where the Test Plan will be created
name
is the only required field in the payload
If successful, you will get a response like:
{
"meta": {
"status": "Created",
"timestamp": "2018-06-07T18:46:54.094+0000",
"location": "https://yourjama.jamasoftware.net/rest/v1/testplans/20494",
"id": 20494
}
}
You will need the id for further operations.
Adding Test Cases to a Test Plan
Test Cases are organized in Test Plans by groups. These groups are only for classification and have no bearing on the way that Test Cases are executed. However, test cases must be added to a Group in the Test Plan; they cannot be added to a Test Plan directly. You can either use the “Default Test Group” present in every Test Plan or create new groups.
To find the default group:
GET /testplans/{testPlanId}/testgroups
where {testPlanId} is the API ID of the existing test plan, (from above, 20494)
If successful, you will get a response like:
{
"meta": {
"status": "OK",
"timestamp": "2018-06-07T19:16:01.311+0000",
"pageInfo": {
"startIndex": 0,
"resultCount": 1,
"totalResults": 1
}
},
"links": {},
"data": [
{
"id": 157,
"name": "Default Test Group"
}
]
}
In a brand-new Test Plan, “Default Test Group” will be the only group. You will need its id if you plan to add test cases to it, or:
To add your own group:
POST /testplans/{testPlanId}/testgroups
with a payload like:
where {testPlanId} is the API ID of the existing test plan (from above, 20494)
{
"name": "Stream"
}
name
is the only required field in the payload
If successful, you will get a response like:
{
"meta": {
"status": "Created",
"timestamp": "2018-06-07T19:20:35.340+0000",
"location": "https://yourjama.jamasoftware.net/rest/v1/testplans/20494/testgroups/160",
"id": 160
}
}
You will need the id for further operations
To add a Test Case to a Group:
At this time, there is no batch operation for adding Test Cases, so each test case must be added individually using:
POST /testplans/{testPlanId}/testgroups/{testGroupId}/testcases
with a payload containing a single test case id like:
where {testPlanId} is the API ID of the existing test plan (from above, 20494) and {testGroupId} is the API ID of the Test Group (from above, 157 for the default group, 160 for the custom)
{
"testCase": 20497
}
testCase
is the only item in the payload and should be set to the API ID of the Test Case you want to add
If successful, you will get a response like:
{
"meta": {
"status": "Created",
"timestamp": "2018-06-07T19:36:44.452+0000",
"location": "https://yourjama.jamasoftware.net/rest/v1/testplans/20494/testgroups/160/testcases/20497",
"id": 20497
}
}
The id returned in this case should match the id of the Test Case you provided in the payload
Creating a Test Cycle
A Test Cycle must be created to execute tests. Test Cycles are created through an existing Test Plan.
POST /testplans/{testPlanId}/testcycles
with a payload like:
where {testPlanId} is the API ID of the existing test plan (from above, 20494)
{
"fields": {
"name": "Internet Explorer",
"startDate": "2018-06-06",
"endDate": "2018-06-13"
}
}
name, startDate, and endDate are the only required fields in the payload. Note that there are other payload options for specifying which Test Groups and statuses are added to the Cycle, but those won’t be discussed here. Consult the API documentation for those options.
If successful, you will get a response like:
{
"meta": {
"status": "Created",
"timestamp": "2018-06-07T20:39:05.921+0000",
"location": "https://yourjama.jamasoftware.net/rest/v1/testcycles/20536",
"id": 20536
}
}
You will need the id for further operations
Finding an Existing Test Cycle:
If you need to work with an existing Test Cycle, it can be found in this manner.
GET /testplans/{testPlanId}/testcycles where {testPlanId} is the API ID of the existing test plan (from above, 20494)
If successful, you will get a response like:
{
"meta": {
"status": "OK",
"timestamp": "2018-06-08T15:57:09.863+0000",
"pageInfo": {
"startIndex": 0,
"resultCount": 2,
"totalResults": 2
}
},
"links": {
... omitted for brevity ...
},
"data": [
{
"id": 20510,
"documentKey": "JEET1-TSTCY-17",
"globalId": "70957",
"itemType": 36,
"project": 43,
"createdDate": "2018-06-07T19:58:19.000+0000",
"modifiedDate": "2018-06-07T19:58:19.000+0000",
"lastActivityDate": "2018-06-07T19:58:19.000+0000",
"createdBy": 5,
"modifiedBy": 5,
"fields": {
"documentKey": "JEET1-TSTCY-17",
"globalId": "70957",
"name": "Build 2018-06-06",
"testPlan": 20494,
"startDate": "2018-06-07",
"endDate": "2018-06-15",
"description": "",
"project": 43
},
"resources": {
"self": {
"allowed": [
"GET",
"PUT",
"PATCH",
"DELETE"
]
}
},
"type": "testcycles"
},
... second object omitted for cookbook example brevity ...
]
}
You will need the id for further operations
Executing a Test
You now have almost all the data needed to record a test execution. Before you can do that, though, you need to find the actual Test Run object created when you created the Test Cycle. You will need the id of the Test Case Item, the Test Plan, and the Test Cycle
GET /rest/v1/testruns?testCycle={testCycleId}&testCase={testCaseId}&testPlan={testPlanId}
where {testPlanId} is the API ID of the existing test plan (from above, 20494), {testCycleId} is the API ID of the Test Cycle (from above, 20536 for the created one, 20510 for the existing), {testCaseId} is the API ID of the Test Case to be executed (from above, 20497)
If successful, you will get a response that looks like:
{
"meta": {
"status": "OK",
"timestamp": "2018-06-07T21:01:36.530+0000",
"pageInfo": {
"startIndex": 0,
"resultCount": 1,
"totalResults": 1
}
},
"links": { ... removed for cookbook example brevity ...
},
"data": [
{
"id": 20539,
"documentKey": "JEET1-TSTRN-520",
"globalId": "70962",
"itemType": 37,
"project": 43,
"createdDate": "2018-06-07T20:39:02.000+0000",
"modifiedDate": "2018-06-07T20:39:02.000+0000",
"lastActivityDate": "2018-06-07T20:39:02.000+0000",
"createdBy": 5,
"modifiedBy": 5,
"fields": {
"documentKey": "JEET1-TSTRN-520",
"globalId": "70962",
"name": "One",
"testPlan": 20494,
"testCycle": 20536,
"testRunSetName": "Internet Explorer",
"testCase": 20497,
"description": "",
"modifiedDate": "2018-06-07",
"testRunStatus": "NOT_RUN",
"project": 43,
"forcePassed": false
},
"resources": {
"self": {
"allowed": [
"GET",
"PUT",
"PATCH"
]
}
},
"testCaseVersionNumber": 1,
"testCaseCurrentVersionNumber": 1,
"sortOrderFromTestGroup": 1,
"testGroup": [
20536,
160
],
"type": "testruns"
}
]
}
If you have specified the id for Test Case, Test Plan, and Test Cycle, you should get one Test Run result in the data. You will need the id for further operations.
Next, you will need to either use PUT or PATCH to update the status of this test run:
Test Runs without Steps:
On test runs without steps, you can simply update the testRunStatus field.
PATCH /rest/v1/testruns/{testRunId}
with a payload like:
where {testRunId} is the API ID of the Test Run (from above, 20539)
[
{
"op": "REPLACE",
"path": "/fields/testRunStatus",
"value": "PASSED"
}
]
PUT /rest/v1/testruns/{testRunId}
with a payload like:
where {testRunId} is the API ID of the Test Run (from above, 20539)
{
"fields": {
"testRunStatus": "BLOCKED"
}
}
Valid values for /fields/testRunStatus are PASSED, NOT_RUN, FAILED, INPROGRESS, and BLOCKED.
If successful, you will get a response like:
{
"meta": {
"status": "OK",
"timestamp": "2018-06-07T21:14:14.611+0000"
}
}
Test Runs with Steps
On test runs with steps, you must pass the entire array of test steps (in the original order) with new statuses.
Here is an example of a Test Run object with steps. Note that the testRunSteps array is implicitly ordered by the step number as seen in the UI:
{
"id": 20569,
"documentKey": "JEET1-TSTRN-525",
"globalId": "70967",
"itemType": 37,
"project": 43,
"createdDate": "2018-06-11T21:34:09.000+0000",
"modifiedDate": "2018-06-11T21:34:09.000+0000",
"lastActivityDate": "2018-06-11T21:34:09.000+0000",
"createdBy": 5,
"modifiedBy": 5,
"fields": {
"documentKey": "JEET1-TSTRN-525",
"globalId": "70967",
"name": "One",
"testPlan": 20494,
"testCycle": 20536,
"testRunSetName": "Internet Explorer",
"testCase": 20497,
"description": "",
"testRunSteps": [
{
"action": "You do something",
"expectedResult": "Something happens",
"notes": "",
"status": "NOT_RUN"
},
{
"action": "You do something else",
"expectedResult": "Something else happens",
"notes": "",
"status": "NOT_RUN"
}
],
"modifiedDate": "2018-06-11",
"testRunStatus": "NOT_RUN",
"project": 43,
"forcePassed": false
}
Given the two steps above, you can do the following:
PUT /rest/v1/testruns/{testRunId}
with a payload like:
{
"fields": {
"testRunSteps": [
{
"status": "PASSED"
},
{
"status": "PASSED"
}
]
}
}
or
{
"fields": {
"testRunSteps": [
{
"status": "FAILED"
},
{
"status": "PASSED"
}
]
}
}
The testRunStatus for the Test Run will then be set automatically according to the status field on the steps.
Congratulations! You’ve executed a Test Case through the API!
Along with create date and modified date, we record the last activity date on every item. While modified date tracks the last time an item was saved, last activity date tracks when the last activity around the item happened. Below we list the types of events that last activity date should be triggered by.
· Item Updates
· Create new Item
· Edit and save Item
—– Note: deleted items cannot be seen so the last activity date is not visible.
· Comments On an Item
· Adding a comment directly to the item
· Deleting a comment that is directly on the item
· Relationships To and From an Item
· Adding a relationship to and from the item
· Removing a relationship to or from the item
· Tags on an Item
· Adding a tag to the item
· Removing a tag to the item
· Attachments on an Item
· Adding attachment to an Item
—– Note: Updating an attachment does not change the last activity date for the items it is a part of.
· Links on an Item
· Adding a link to an Item
· Editing a link on an Item
· Removing a link on an Item
· Reviews and Baseline
—– Sending items and creating baselines does NOT update the last activity date
· Executing Test Run *Only* updates test run’s last activity date
This document will review how you can use the abstract items endpoint to search for items with customized filters. Our abstractitems endpoint offers the best search and filtering capabilities in our API.
Abstract items a generic resource for getting the various types of items in Jama. This resource will return items you can pull from /items, /testplans, /testcycles, /testruns, /attachments. While there are a few endpoints within the abstract items resource, this article will focus on the search capabilities of the GET /abstractitems endpoint.
GET /abstractitems
Response Model
This endpoint returns an array of items. You can review our data model and our paging on our Dev portal. This endpoint also has support for our includes feature. The includes feature lets you get more information out of your results without making more calls and it is recommended to use with this endpoint.
Search Parameters
This endpoint offers many query parameters that you may use to narrow your results to precisely what you are looking for. We will cover these parameters in more detail later, for now let’s consider some basic rules so you can correctly set up your query.
Matching Lists
Valid for: project, itemType, release, documentKey, contains
If you would like to provide more than one value for a parameter, you may repeat the parameter. For example, if you want to see all items in either project 15 or 20, then you can make a request like this:
curl -X GET 'https://{baseUrl}/rest/v1/abstractitems?project=15&project=20'
Remember that when the parameter is repeated, you are grouping the values together with OR expressions. You will get broader results as you add more parameters of the same type.
Matching Date Time Fields
Valid for: createdDate, modifiedDate, lastActivityDate
The date base parameters operate a little differently. You may provide one or two ISO8601 values. When one date time is provided, it will return items which match that field within the range from the date provided to the time of the request. When two values are provided, it will return items which match that field within the range of the two provided date times. The date values should use the ISO8601 date time format: yyyy-MM-dd’T’HH:mm:ss.SSSZ. Note that these date time formats are set using the UTC timezone or zero timezone offset.
In this example, we would get all items with a modifiedDate from 2018-06-19T21:29:15.037Z up to the time the request is made:
curl -X GET 'https://{baseUrl}/rest/v1/abstractitems?modifiedDate=2018-06-19T21:29:15.037Z'
This example will return all items with a created date between 2018-06-01T00:00:00.000Z and 2018-06-07T00:00:00.000Z:
curl -X GET 'https://{baseUrl}/rest/v1/abstractitems?createdDate=2018-06-01T00:00:00.000Z'&createdDate=2018-06-07T00:00:00.000Z'
Sorting Results
Parameter: sortBy
After you’ve chosen your filters, you may want to sort the results you get back. If you do not provide a sortBy value, results will default to sorting by sequence in ascending order and then by documentKey in ascending order. You may provide one or more fields to sort by and they will be used in the order they are sent in.
You must format the sortBy value this way:
{fieldname}.{order}
where fieldname is the fieldname and order are “asc” for ascending, or “desc” for descending.
This example will sort results by project in ascending order first, and then by last activity date descending second:
curl -X GET 'https://{baseUrl}/rest/v1/abstractitems?sortBy=project.asc&sortBy=lastActivityDate.desc'
Mix and Matching Parameters
Valid for: project, itemType, release, documentKey, contains, createdDate, modifiedDate, lastActivityDate
You may use any combination of query parameters in your query. So, you will be able to find all defects (specific item type id) from 2 different projects, that must contain the word “vegetables”. When constructing these types of queries, remember this basic rule:
Duplicated parameters are grouped together with OR expressions.
These sets of parameters are then ANDed with each other.
For example, consider this request:
curl -X GET 'https://{baseUrl}/rest/v1/abstractitems?project=1&project=2&itemType=27&contains=vegetables'
There are 2 project params, 1 item type param, and 1 contains param. The logical expression for filtering results will look like this:
(project = 1 OR project = 2) AND (itemType = 27) AND
(contains = vegetables)
From here it should be possible to create complex filters on the fly.
Parameter Details
Contains
– The contains param lets you find items whose content contains your provided string values. Additionally, you can use some Lucene syntax if you format your string correctly.
In this example, Jama would return all items where the content contains the word “fire”.
curl -X GET 'https://{baseUrl}/rest/v1/abstractitems?contains=fire' -H
An item will be matched if “fire” shows up in the name, description, any text field, and even the label of a picklist option if that option is set to the item. the case is ignored.
If you are interested in building more complex queries to filter on specific fields,
Simply wrap the same expression with double quotes and use it with the contains query params.
curl -X GET 'https://{baseUrl}/rest/v1/abstractitems?contains="name:
"fire" AND name: "water""'
Please note that this works the same as the search bar in the UI. the main twist is that wild cards may be added to your Lucene query. When specifying fields, remember to use the name of the field and not the display or label. We are considering a different implementation for Lucene queries, so you may have better control.
project
– This simply matches items with the same project id.
itemType
– This simply matches items with the same item type id.
documentKey
– This simply matches items with the same document key.
release
– This simply matches items with the same release id.
createdDate
– See the above section on matching dates. This parameter will match with the created date of an item. Created date is set when it is first created.
modifiedDate
– See the above section on matching dates. This parameter will match with the modified date of an item. Modified date is updated when an items content changes and a new version is made.
lastActivityDate
– See the above section on matching dates. This parameter will match with the last activity date of an item. Last activity date is more sensitive to changes that are not reflected with the modified date. Comments directly on the item, relationships made to the item, changes to the location of the item, attachments added to an item will update the last activity date. More details description of changes to come.
Jama uses a version of Lucene search to help drill down into Abstract Items. It is important to understand the viable Parameters that are available, and the expected results from these parameters. Below you will find a breakdown of the Parameters. If we missed a scenario, please let us know!
Admins and API Developers should also be aware of the limitations of Lucene searches. For example, Jama will NOT be able to guarantee an exact match without using parameters to refine the search results. With the way Lucene data is indexed, exact match is difficult at best. Jama plans to continue to review ways to fine-tune these processes.
Example:
Assume 5 items have been created in the same project:
Item 1 – Name: Alpha
Item 2 – Name: Alpha Beta
Item 3 – Name: Beta Alpha
Item 4 – Name: Beta
Item 5 – Name: Happy Path with an item Description: includes the word “Alphabet”
| Parameter | Contain’s Term | Result count of 5 Examples | Detail |
| No Parameter | Alpha | 3 | Finds only Items 1, 2, 3 Result is limited to instances with an exact representation of “Alpha” as one of the terms avail. |
| Double Quotes (“) | “Alpha” | 4 | Finds four of five Item results Uses Wildcards to search for the term inside other terms (such as “Alphabet”) |
| “Alpha Beta” | 5 | Finds all five Item results Uses Wildcards to search for the term inside other terms (such as “Alphabet”) | |
| Single Quotes (‘) | ‘Alpha’ | 3 | Same as No Parameter |
| Double Quotes and Wildcards (“*”) | “A*pha” | 4 | Searches for any results with any character in the second place. |
| Add Field | “name:”Alpha”” | 3 | Only returns items where Alpha is in the Name field. |
| Quotes with Plus/Minus (“+/-“) | “+Alpha Beta” | 4 | Finds items 1, 2, 3, 5 Counts + element as a requirement |
| “Alpha +Beta” | 3 | Finds items 1, 2, 3 Counts + element as a requirement | |
| “Alpha -Beta” | 2 | Finds items 1, 5 All results with the word Beta are omitted | |
| “+Alpha +Beta” | 2 | Finds Items 2, 3 Only results that include both Alpha and Beta are returned. | |
| “-Alpha Beta” | 1 | Only Beta is returned |
It should be noted that (as seen in swagger) there is an application of bitwise OR operators. When applying a single string such as “Alpha Beta” the wild card parameters are taking the literal characterizations and searching for matches. If you structure requests which are looking for finite data inside specific fields such as IDs, you need to ensure you use multiple contain requests else you will create un-achievable requests
| Sample Input | Expected Result |
|---|---|
| &contains=”id:13108 13111″ | Will Fail – an id cannot have variable or wildcard values |
| &contains=”id:13108″&contains=”id:13111″ | Will return two unique results because of Bitwise |
For more details on Lucene Syntax, feel free to peruse the official Apache documentation.
For more details on Bitwise operators, see the Wikipedia page on Bitwise operations.
Attachments in Jama encompass a variety of files, such as images, graphs, tables, equations, and more. This document aims to provide clear guidance on utilizing our REST API to upload and associate attachments with items in Jama using Postman.
Two Ways to Utilize Attachments in Jama:
1) Attach a file to an item
Files are uploaded to Jama items in a sequence of steps through the Rest API
2) Embed a Clickable Link to an Attachment within an Item’s Text
Use the attachment item ID to embed a clickable link within the text of a Jama item, providing a seamless reference to the attached file.
Attach a File to an Item:
Step 1: Create an Attachment Item
Attachment Items serve as containers for attachment metadata, including a name, description, and any other relevant fields associated with the attachment item type. This step is akin to filling out the name and description when creating an attachment through the Jama UI.
POST the attachment Item using the following endpoint:
POST /projects/{projectID}/attachments
{
"fields":{
"name": "Attachment_Name",
"description": "Description_of_Attachment"
 // Additional fields as required by the attachment's item type
}
}
Response:
{
 "meta": {
 "status": "Created",
"timestamp": "2023-11-28T19:26:08.359+0000",
"location": "https://{base url.com}/rest/v1/attachments/70415",
 "id": 70415
}
}
Step 2: Upload the Attachment File
Files are uploaded to Jama using a PUT request with formdata to the following endpoint:
PUT /attachments/{attachmentID}/file
- Files are uploaded to Jama items in a sequence of steps through the Rest API
- If a 200/201 response status is received, the file has been successfully uploaded to the Jama attachment.
Step 3: Associate the Attachment with an Item
To associate an attachment item with a Jama item, ensure that the attachment widget is enabled on the Jama item’s item type before establishing an association. The attachment item, in this context, refers to an item containing metadata about an attachment.
- Use a POST request to the attachment endpoint of the item you wish to associate with, providing the attachment item ID.
- The attachment item ID is a mandatory requirement for all cases.
POST the attachment as an example using the following endpoint:
POST /items/{itemID}/attachments
{
"attachmentItemId": 123
}
Important Note:
- Attachment widget must be enabled on the item type before associating attachments to items.
- It’s crucial to ensure that the attachment widget is enabled on the relevant item type to successfully associate attachments with items.
Embed a Clickable Link to an Attachment within an Item’s Text:
The process of embedding clickable hyperlinks for attachments within content through our REST API. This allows you to create clickable links in Rich Text fields that facilitate the download of attachments.
Creating Clickable Links to Attachments:
Step 1: Get Attachment Information
After creating an attachment item and uploading the attachment’s file (Steps #1 and #2 from the previous approach), retrieve the attachment item using the endpoint:
GET/attachments/{attachmentID}
Retrieve the attachment value and filename from the fields section. Note: the attachment value is not the attachment item’s ID but the value stored in the fields section of the attachment object.
{
 "attachment":78574,
"fileName": "poppy.jpeg",
}
Step 2: Create a Hyperlink
Form a string with one of the following structures:
,imag src=\”https://product.jamacloud.com/attachment/2006/Aspens1.jpg\”>Clickable Text
Step 3: Update Jama Item’s Rich Text Field
Insert the string from Step #2 into a Rich Text field of a Jama item using any endpoint that creates or updates the item’s content.
PUT /item/{id}
Note: Place the items ID you are wanting to place in API endpoint for the attachment and any additional body elements.
Result: A clickable link will appear in the item’s Rich Text field, allowing users to download the attached file.
Downloading Linked Attachments:
Step 1: Retrieve the Attachment Link
Retrieve the object containing the embedded attachment link using one of the available endpoints:
- GET /items/{itemID}
- GET /testplans/{testPlanID}
- GET /testruns/{testRunID}
Step 2: Parse out the Attachment Link
Parse out the embedded attachment link from the retrieved object’s Rich Text field’s content. Utilize parsing libraries such as JSOUP for Java or BeautifulSoup for Python.
Step 3: Download the Attachment File
Download Attachment file using the endpoint:
GET/files
The request payload should contain the parsed link URL obtained in Step #2, structured like:
https://{base_url}/attachment/{attachemntValue}/attachmentFileName
Result: Upon receiving a 200/201 response status, the attachment file will be successfully downloaded to your working directory.
You have now successfully embedded a clickable link to your Jama attachment item and downloaded the linked attachment file.
Below is a list of Attachment endpoint
attachments
| URL | Description |
|---|---|
| GET /rest/v1/{attachmentId} | Gets attachment metadata |
| PUT /rest/v1/attachment/{attachmentId}/file | Uploads file to attachment |
| GET /rest/v1/attachment/{attachmentId}/file | Download the attached file |
| GET /rest/v1/attachments/{attachmentId}/comments | Gets all comments for attachment Item |
| GET /rest/v1/items/{id}/attachments | Gets attachments on an Item. This also works for test plans and test runs. |
| POST /rest/v1/items/{id}/attachments | Associates attachment item to the item |
| DELETE /rest/v1/item/{id}/attachments/{attachmentId} | Removes the association from the item. The attachment item still exists. |
When creating Relationships between items in Jama Connect, API Users sometimes experience API behavior that appears to contradict my Project Relationship rules, resulting in a “Bad Request” and a “Relationship violates rules configured for the project: from item ID: X, to item ID: Y”
Two things to pay attention to here:
- API request directions From-To matters!
- Relationship Rules: Small differences can have a big impact.
API request directions From-To matters!
Users of the API should be cognizant that fromItem and toItem are specific functions and dictate which rules are to be used.
- The input value fromItem is the form item key that will be looked at to check for Relationship rules.
- Conversely, toItem is always the element that is being linked to.
- If the rules for a project are different for each item, then the From and To will definitely matter
Relationship Rules: Small differences can have a big impact.
Relationship Rules are Fickle on purpose. Because Relationship Rules will likely vary between organizations and projects, it is impossible to hit every scenario but check below for one very complex scenario that hits on many of the major themes in Relationship creation and cross-project usage.
In one scenario, ProjA and ProjB are expected to relate to each other
| ProjA | ProjB |
|---|---|
| 1 Automotive System Req (ASYS) | 1 Automotive System Req (ASYS) |
| 1 Feature (FEAT) | 1 Feature (FEAT) |
- Project A has rules that allow Features to be Derived From Requirements
![]()
- Project B has also been applied to a rule set, but where no rules were created.
- This was a purposeful action by the Admin
- The creation (and application) of this empty rule set states to Jama “Items in this Project are not allowed to be related.”
![]()
- When linking an ASYS Req in ProjA to a Feat in ProjB, the Admin and users have an expectation that this will function.
- In the above scenario, all links fromItem ProjA –> toItem ProjB would be blocked and marked as “Bad Request”.
While the rules of ProjA would allow a relationship, ProjB (which is purposefully empty) denies that these relationships are allowed. - The Jama API is required to look at both rule sets and trust/follow instructions as presented.
- To allow creation of these relationships across projects, one of the following is required
- Fix: ProjB rules should be clicked to “Allow relationships with item types not in this rule”
Data would be allowed to link to ProjB items to other ProjB in any manner as no rules are expressed
Data would only be allowed to link ProjB to ProjA items that follow ProjA rules. - Fix: ProjB is removed from the empty Rule set.
Data would then be linkable as it is no longer using explicitly omitted rules. - Fix: ProjB has rules created that match the Admin’s prescribed functions.
- Fix: ProjB rules should be clicked to “Allow relationships with item types not in this rule”
- In the above scenario, all links fromItem ProjA –> toItem ProjB would be blocked and marked as “Bad Request”.
Note that Jama only supports JSON but the Content-Type value is required
Creating Test Cases and Test Steps via API
Test Cases are different than Test Cycles, Test Plans, and Test Runs. While each of these elements has strong workflows and separate REST endpoints for their management, Test Cases are nothing more than Normal items with a specific JSON structure needed to craft the steps. This Cookbook item will cover the automated creation of a Test Case via the API.
Start by hitting up the POST /items endpoint. Create your call to the service as you would any other Item creation request, but pay attention to the following Structure changes to include Test Steps
| Data Model | Specific request |
|---|---|
{
  "globalId": "string",
  "project": 0,
  "itemType": 0,
  "childItemType": 0,
  "location": {
    "parent": {
      "item": 0,
      "project": 0
    }
  },
  "fields": {
    "additionalProp1": {},
    "additionalProp2": {},
    "additionalProp3": {}
  }
}
|
{
"project": 57,
"itemType": 26,
"childItemType": 0,
"location": {
   "parent": {
      "item": 14771
       }
    },
"fields": {
   "name":"API Generated Test Case with two Steps",
   "description":"Two Test Steps will be created for this Item",
   "testCaseSteps": [{
      "action":"Step 1",
	  "expectedResult":"Http 200 result",
      "notes":"none"
      },
      {
      "action":"Step 2",
	  "expectedResult":"Dancing Bears",
	  "notes":"none"
	  }]
	}
}
|
- For this example, I have omitted the global ID reference as I have no need to manually set one (and rarely do).
- I am also omitting the Parent element of location as I need this grouped under my Test Cases set.
- From here the POST call is normal until you get to testCaseSteps
- Note the additional square bracket [..] opening and closing the testCaseSteps. This is the same bracket you see structurally in the Data model when a TestCase is returned to you via GET.
- Each testCaseStep is included as a comma-separated {..} subset.
On submission, I receive back an HTTP 201 response advising of my brand new ItemID
Inside Jama, I see my new item with testCaseSteps

From here, you can even add in additional workflow. Say you want to capture that this event was performed via API using a dedicated API id/token but was on behalf of a specific person or project.
Grab the itemID from the Created response and use the POST Comment function to insert your comment so the team can see this in the Test Case as well as the Comments Stream.
Administration activities are available for reporting via the REST API at /activities/adminActivity. These activities have a new structure to better handle the different areas within administration and improve machine readability.
JSON Format
A new JSON format has been introduced to organize the details. Important Note: The details field is serialized and will need to be deserialized when reading the JSON.
Example JSON:
{
"id": 10634515,
"date": "2020-09-08T20:12:10.000+0000",
"user": 22856,
"userName": "Josh Smith",
"action": "Picklist modified",
"eventType": "UPDATE",
"details": "{\"verb\":\"edited\",\"targetType\":\"user\",\"targetObject\":\"Ron Washington\",\"changes\":[{\"field\":\"Last name\",\"initial\":\"Wishington\",\"updated\":\" Wishington \"}],\"children\":[]}"
}
Detail fields:
| Field | Description |
|---|---|
| verb | Action taken resulting in the creation of an activity. |
| targetType | The area in the admin that created the activity. |
| targetObject | The name of the specific object in the target type. Examples would be the name of the user, name of the group, etc. |
| changes | Collection of changes that are made. Depending on the type, several changes could be included in a single activity. |
| children | This is a special field used to show a parent-child relationship. An example of this is a pick list with picklist values and item types with item type fields. |
Target Types:
- item type
- organization
- permission
- pick list
- project
- relationship rule set
- relationship type
- user
- user group
- workflowSub – target types that would only appear in body (within ‘children’ JSON attribute): item type
- value – as in picklist value
- relationship rule
Verbs:
- added
- edited
- removed
- deleted
- activated
- deactivated
- substituted
- overrode
- indexed
On Jama’s REST API, we’re using the best practice regarding dates and time zones ( ISO-8601 ).
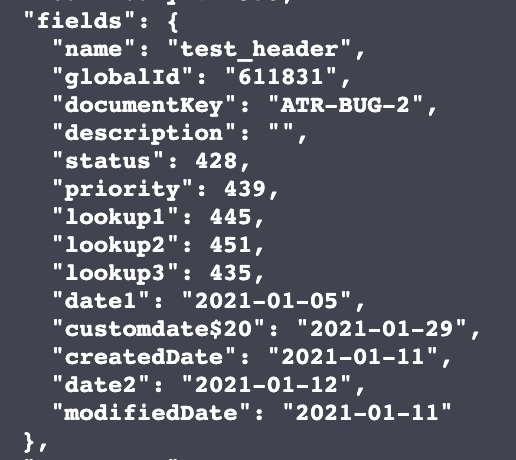
The only section where this is not true is when serializing dates on the fields array:
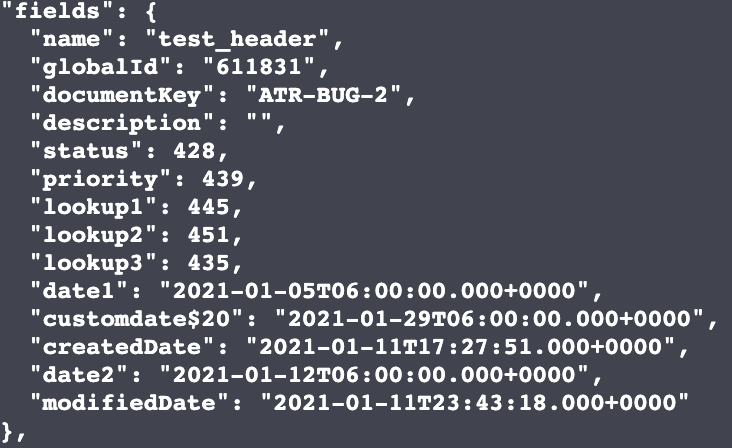
Below are the results of a GET request. Notice how the “createdDate” is serialized as ISO-8601. The dates inside the fields array are not. We want to get the full date there, including time and timezone.
{
	"data": {
	"id": 2973,
	"documentKey": "CL3-BUG-1",
	"globalId": "GID-14616",
	"itemType": 27,
	"project": 25,
	"createdDate": "2015-09-30T10:36:42.000+0000",
	"modifiedDate": "2021-01-08T20:57:44.000+0000",
	"lastActivityDate": "2021-01-08T20:57:44.000+0000",
	"createdBy": 5,
	"modifiedBy": 5,
	"fields": {
	"documentKey": "CL3-BUG-1",
	"globalId": "GID-14616",
	"name": "iOS music sound controls don't work",
	"description": "The sound controls don't work.",
	"priority": 300,
	"user1": 9,
	"assignedTo": 10,
	"dev_url$27": "1",
	"date1": "2021-01-16",
	"customDate$27": "2021-01-29",
	"modifiedDate": "2021-01-08"
},
//the rest of the JSON response
The Solution
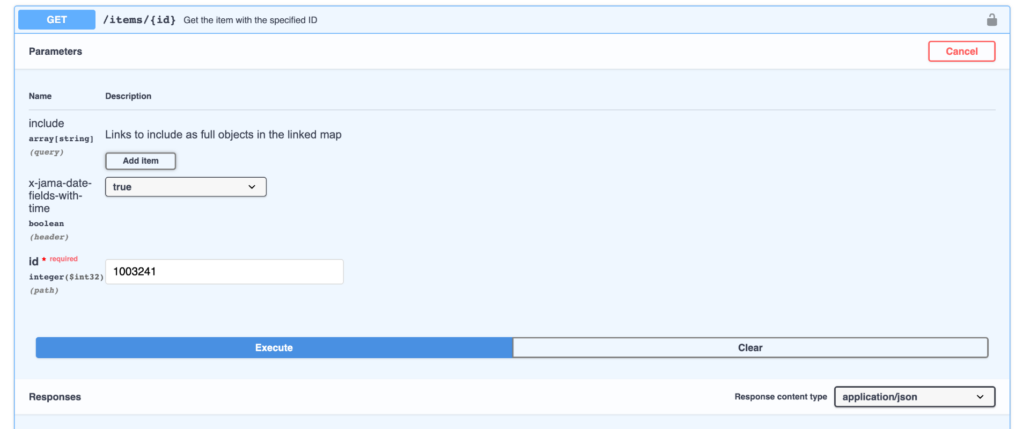
To provide an option for using ISO-8601 in a backward-compatible way, we created the x-jama-date-fields-with-time” header.

When the x-jama-date-fields-with-time” header appears as true, dates in the fields array will be fully serialized as ISO-8601 (including time and timezone).
Try in Swagger
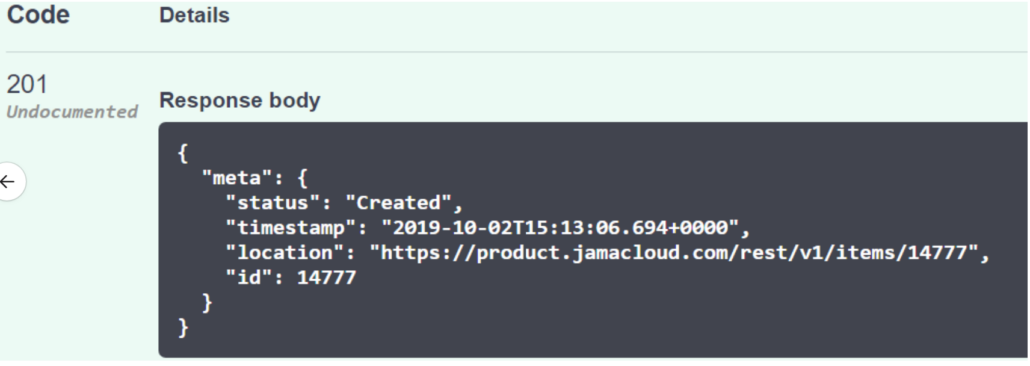
If you desire to use this header in Swagger all you need to do is set parameter value = true. If not, feel free to either ignore it and let it go without any value or set the value to false, either way, it will bring back the results without the time as shown below.
Without header
With header
Prior to the release of Jama Connect 9.2, the use of GET /relationships could cause large performance and system stability issues. Additional parameters to the call provide developers with options to make the call more performant and retrieve more results with each call. Adjustments were made with 9.7 and the following changes are required for anyone using the endpoint.
The GET /relationships API call allows for the following parameters to be associated on the call:
| Parameter Name | Required | Parameter Datatype | Parameter Description | Constraints |
|---|---|---|---|---|
| project | Yes | Integer | This specifies the unique API-Id of the project to which to scope the from and to Items that are included as part of the relationship pairs. | The project value must be a valid project id. |
| startAt | No | Integer | This specifies the position in the overall list of values to start retrieving from – this only applies when using default paging (not lastId paging). See the discussion below for paging scenarios. | The parameter was superseded and no longer needed. |
| lastId | Yes | Integer | This specifies the relationship id (see data elements above) from which the caller wants to retrieve values. See the discussion below for lastId paging. This parameter is optional and if not included, standard paging will be assumed. | |
| omitCount | No | Boolean | Setting this parameter to true will return totalResults in the data payload as 0. This avoids the system from having to calculate an overall count for each call and improves general performance. | The default value for omitCount is false – which indicates the count will be included. |
| maxResults | No | Integer | This specifies how many items to return for a given call. | The maxResults value must be between 1 and 1000. |
Retrieve Relationship with lastId paging
lastId paging which is described here relies on targeting a known id and retrieving a set number of results starting directly after that id. Standard paging relies on knowing the position in a list and retrieving a set number of results from the position. LastId paging due to its implementation at the database management system level tends to be more performant. Side note: there might be a reason for knowing the totalResults as part of the overall process. If so, then this call could be modified to have omitCount=false to get the totalResults on this initial call and then change to omitCount=true for the subsequent calls.
When using lastId paging, the system will take whatever lastId is received and then return the next set of ids from that point based on the maxResults. So, if a caller passes in lastId of 399 and maxResults of 1000, the system will return the next 1000 values starting at whatever id is greater than 399 (the lastId specified). Note that the ids are not necessarily contiguous. Your return set might have ids (based on the preceding example) of 134, 389, 510, 711, 912, 1056, etc. Ids are not contiguous since the caller is scoping to a particular project and relationships may be created over the entire instance, across multiple projects – the id value of the relationships are not tied to the project.
To utilize lastId paging, the caller simply adds the lastId to the call. A typical call would look like this: https:///rest/v1/relationships?project=314&lastId=159265 or generically https:///rest/v1/relationships?project=&lastId=.
Note:
Because lastId is required, the startAt value is ignored even if it is included. So if the call was: https:///rest/v1/relationships?project=314&lastId=159265&startAt=10, the startAt value is simply discarded by the system, and the call will start at relationship id of 159265 and return the default maxResults of 20.
The best approach is simply to make an initial call with a lastId of 1 to find the initial lastId, which is best done by https:///v1/relationships?project=314&lastId=1&omitCount=true&maxResults=1
The payload will look something like this:
{ "meta":
{"status": "OK",
 "timestamp": "2023-05-29T12:24:48.962+0000",
 "pageInfo":
 {"startIndex": 0,
  "resultCount": 1,
  "totalResults": 0}},
 "data": [
  {"id":90901,
     "fromItem":1010,
     "toItem":2109,
     "relationshipType":4,
     "suspect":false,
    "type": "relationships"}]
}
Note that the lastId here is 90901
Now make the next call and retrieve a batch size (e.g. 100 at a time). The lastId is now 91901.
Call looks like this: https:///rest/v1/relationships?project=314&lastId=90901&omitCount=true&maxResults=100
Data Payload return (only the first and last relationships are shown for brevity):
{ "meta":
 {"status": "OK",
  "timestamp": "2023-05-29T13:24:48.962+0000",
  "pageInfo": { "startIndex": 0, "resultCount": 100, "totalResults": 0}},
  "data": [
 {"id":90904, "fromItem":1400, “toItem":2605, "relationshipType":4, "suspect":false, "type": "relationships"},
 {...},
 {"id":93904, "fromItem":600, "toItem":665, "relationshipType":4, "suspect":false, "type": "relationships"}
]}
Note that the lastId is now 93904 since it is the id of the last relationship that has been returned to the caller.
Continue making these calls until the resultCount is less that the provided maxResults or the payload has empty data,
The return payload will look something like this:
{"meta":
 {"status": "OK",
  "timestamp": "2023-05-29T13:24:48.962+0000",
  "pageInfo": { "startIndex": 0, "resultCount": 0, "totalResults": 0}},
  "data":[]
}
Note: The caller watches for an empty data payload to stop the process. The decision to omit totalResults may vary based on the specific implementation requirements.
This example demonstrates the flexibility of lastId paging, accommodating various batch sizes and providing options for efficient data retrieval. The user can choose an approach based on their specific needs and system constraints.
Various FAQs
How can I know the lastId value before making an initial call?
You cannot. You must make an initial call to find the lastId to find the starting relationship Id. The caller can make a first call to retrieve the first relationship value for a single item (without startAt values) and then use this as the starting lastId.
How can the initial call be the starting lastId value? The ids values aren’t deterministic, are they?
The call to GET /relationships is always sorted by the relationship ID values in ascending order, therefore once you know the first value paging through the rest is deterministic.
Is it okay to request more results in a batch than are in a given project?
Yes. The batch will only ever return as many values as available and the resultCount will be returned the appropriate number.
There doesn’t seem to be any constraint on the lastId value. Can I send any number here? And is it okay if the relationship id is not in the target project?
Yes. Only relationship ids that are in the target project will be returned. If you specify a relationship id that is not in the target project but there are relationship ids in the target project greater than the last Id then some values may be returned. For example, if project A has relationship ids 5, 20, 30, and 67; and project B has relationship ids 25, 35 and 50. If you attempted to retrieve relationships from project B but specified a last Id of 30 you would get relationship ids of 35 and 50 from project B but not relationship id 67 since that is in project A. Note that technically relationships are not targeted to projects but rather the items on either end of the relationship are in the project so there are some odd possibilities here.